Easily Migrate Data from Android Devices to Samsung Galaxy S25/S25+/S25 Ultra
When another new Samsung phone comes, you could be one of the Samsung users. After the launch of Samsung Galaxy S25 and Samsung Galaxy S25 Ultra, most of users need to find a quick way to transfer data from computer or from another iOS device to the new Samsung phone or another Android device to the new Samsung phone, including contacts, messages, photos, music, videos, apps and more. In this article, you will get three effective ways to sync all data from an old Android device, Huawei, Xiaomi, Samsung, Google, OnePlus, HTC, LG, Sony and all other Android phones and tablets to your new Samsung Galaxy S25.

- Solution 1. Directly Sync Data from an Android Device to Samsung Galaxy S25/S25+/S25 Ultra
- Solution 2. Selectively Copy an Android Device Files to Samsung Galaxy S25/S25+/S25 Ultra
- Video Tutorial - Sync Android Data to Samsung Galaxy S25/S25+/S25 Ultra
- Solution 3. Move an Android Device Data to Samsung Galaxy S25/S25+/S25 Ultravia Smart Switch
Solution 1. Directly Sync Data from an Android Device to Samsung Galaxy S25/S25+/S25 Ultra
The transfer job could be much easier if you own a helpful tool when migrating data from another device to Samsung Galaxy S25/S25+/S25 Ultra. Syncios Data Transfer proves a great helper to sync data from phone to phone. It provides a quick and convenient solution to migrate data. By following this method, you can get all important files transferred from an Android device to your new Samsung Galaxy S25/S25+/S25 Ultrasimply with few steps. And check all following reasons why you need to give Syncios Data Transfer a try.
- ❶: You can 1-click to transfer contacts, messages, call logs, calendars, photos, apps, videos, music to Samsung Galaxy S25.
- ❷: You can backup another iOS / Android device the restore the backup to Samsung Galaxy S25 when you need.
- ❸: You can check all backup files easily on computer.
- ❹: You can install this transfer tool on Windows PC or MacBook.
Step 1: Connect Phones to Computer
Get a Windows version or a Mac version of Syncios Data Transfer installed via downloading buttons above. Connect both phones to computer via USB cables. Check your internet connection to get ready. As soon as you connect phones to computer, unlock them and set the connection mode as Transfer File (MTP). At the same time, you need to enable the USB debugging mode on both phones. Otherwise, Syncios could not get access to your files.
Step 2: Choose "Transfer" mode
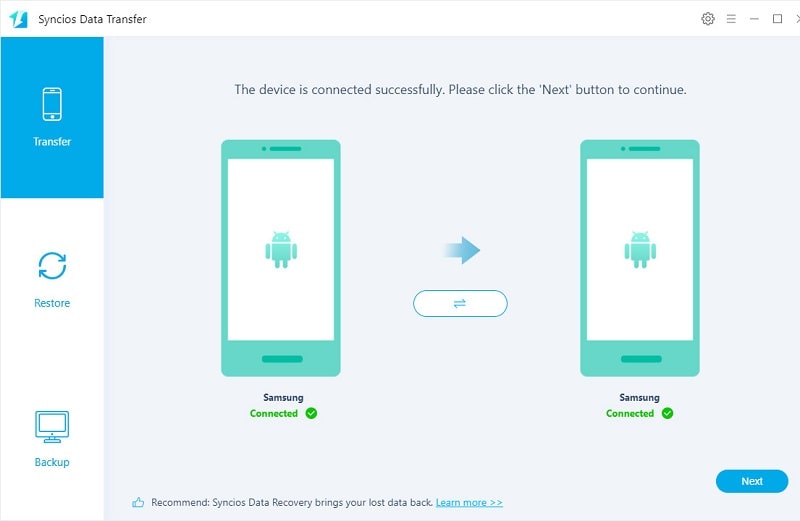
Let's check the start-up interface, three modes you can find here: Transfer, Restore, Backup. Select Transfer mode to sync data from phone to phone. You are in "Transfer" mode when you open this program.
Check positions of two phones, the source device is on the left while Samsung Galaxy S25 is on the right. You can exchange their positions via a flip icon on the middle. When the positions are confirmed, click on Next on the lower right.

Step 3: Transfer Contents from Android to Samsung Galaxy S25
On the content selection interface, go to the lower left corner. An option is provided to "Clear data before transfer". It will remove all corresponding files on your target phone if you tick off this option. So be cautious. Select contents you need then click on Next to load all files on your source device. It will show how many items every content includes. You can choose to transfer all contents at once, or just select several contents at the same time. The Next button helps you to initiate the transfer.
Syncios will automatically skip some duplicated files. And unlock your phones to make sure you will not ignore any prompts on your phone which remind you of allowing the access to your phone files.

If you need to backup all files from an Android device or Samsung Galaxy S25, then choose to restore the backup in the future, you can go to Backup mode to backup all files then go to Restore > Syncios Backup to restore the previous backup.
Solution 2. Selectively Copy an Android Device Files to Samsung Galaxy S25/S25+/S25 Ultra
To save space on Samsung Galaxy S25, some users choose to transfer part of contents to Samsung Galaxy S25/S25+/S25 Ultra. And if you've got Samsung Galaxy S25/S25+/S25 Ultrafor a while, you may wonder how can I move some files I need instead of all files. Try another tool called Syncios Mobile Manager. It allows you to preview all files on your phones and choose what you need to transfer. This a comprehensive tool and you will find it useful whenever you need to manage files on your mobile phones. And for transferring data from another Android device to Samsung Galaxy S25/S25+/S25 Ultra, we will tell you why you need this tool.
- ❶: You can selectively export and import media files, including photos, photo albums, songs, videos on phones.
- ❷: You can selectively backup contacts, messages, apps with detailed preview.
- ❹: You can preview, edit, delete files on your phones before the backup.
- ❺: You can check all backup files easily on computer.
- ➏: You can find a Phone Transfer tool (Syncios Data Transfer) under its Toolkit column, check the difference between Syncios Mobile Manager and Syncios Data Transfer here >>
- ❼: You can get other handy tools: online video downloader, ringtone maker, audio converter, video converter.
Step 1: Connect Phones to Computer
Download the free version of Syncios Mobile Manager to a Windows PC or a MacBook. Get both and Android device and the Samsung Galaxy S25, turn on the USB debugging mode on both phones. Then choose "Transfer File" connection mode. Unlock your phones in case any prompt is ignored.
Step 2: Save Files from the Android Device to Computer
On the left sidebar, find the content list. All files are categorized here.
◎ Choose media files you need from the Android device, photos, music or videos then click on Export to save the selected media files to computer.
◎ Go to "Apps, Contacts, SMS" tabs to check all details of every content. You can preview and edit files. Choose files you need, then click on Backup.
For instance, if you need to backup contacts, choose Contacts option. Syncios will load all contacts from the connected Android device. You can backup, restore, delete, edit and remove duplicated contacts. Select contents you need then click on Backup or just tick off the check box in front of Name above all contacts to select all contacts at once. A pop-up window will give you an option Browse. Click this button to set a proper backup path. Then click on Backup to save contacts from the Android device to computer.

Step 3: Restore Backup from Computer to Samsung Galaxy S25
For different contents, the recover buttons will be different. But you can take the similar steps. It's easy.
◎ To restore backup to Samsung Galaxy S25, click on Add/Import to import media files from computer. In fact, you can also import photos, songs, videos from computer to your Samsung Galaxy S25 without any backup.
◎ For restoring contacts and messages backup folders, click on Recover to restore the new created backup.
◎ Click on Add to import app apk files from computer to your Samsung Galaxy S25.
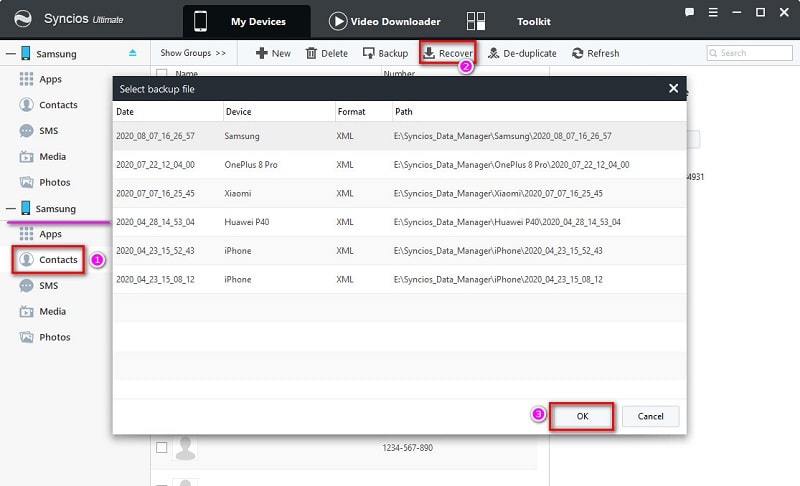
For instance, if you just backed up contacts of an Android device, do not move the new created backup on your computer. Navigate to Contacts of Samsung Galaxy S25 device. Then click on Recover to load all created backups by Syncios. From the backup list, choose the one you need and click on OK to start the restoration. Do not disconnect your phones and check all prompts on your phones in time. Your data is not overwritten. Existing content remains when the content is added to your new device

Video Tutorial - Sync Android Data to Samsung Galaxy S25/S25+/S25 Ultra
Solution 3. Move an Android Device Data to Samsung Galaxy S25/S25+/S25 Ultravia Smart Switch
There are obviously other ways that you can use to transfer files from Samsung to Samsung. And one of them is Smart Switch App. Samsung offers a dedicated application so that it will be easier for the users to transfer data between Samsung devices and other Android devices. After the Galaxy S6, this app comes pre-installed on Samsung phones. The steps to use it for transfer are given below.
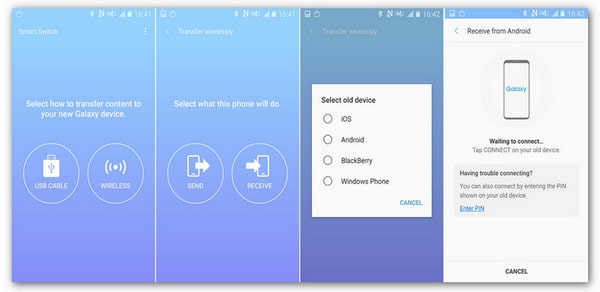
Step 1: Open the Play Store and install the app on your Samsung device. Make sure that you download the app on both devices. Go to Play Store to install Smart Switch on both devices. Transferring data via USB connection or transferring data wirelessly are supported.
Step 2: Launch the app on both devices and choose the transfer mode. If you choose to transfer without the USB connector, place the phones within 50 cm of each other to ensure a proper transfer. Then choose the Send option on the source phone. At the same time, you are prompted that the permission is needed to receive the data. Choose the Receive option on the target device.

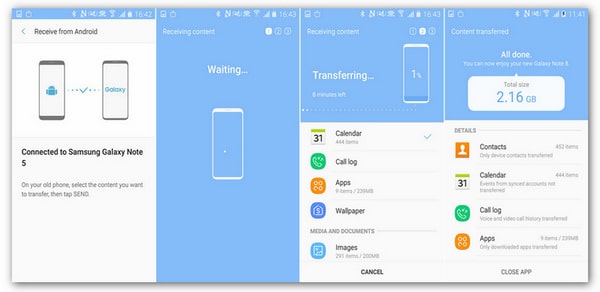
Step 3: Once the two devices are connected successfully, all available contents are displayed here, choose the type of data you need then start the transfer.

Conclusion
This article provides 3 different solutions to transfer files from an Android device to Samsung Galaxy S25. Check all steps and you will find all solutions could be helpful on different occasions. If this guide helps, don't forget to share it with your friends.
More tips I want to share. Check how to distinguish Syncios Mobile Manager and Syncios Data Transfer.
1. Syncios Mobile Manager is designed to manage files on mobiles devices and you can import media files from computer to phones via this tool. Syncios Data Transfer supports to transfer data between phones directly, backup and restore data on mobile devices, and restore files from iTunes, iCloud backup, iTunes Library to mobile devices.
2. Syncios Mobile Manager provides Syncios Mobile Manager free version and Ultimate version.
3. Syncios Mobile Manager Ultimate version provides "Phone Transfer (Syncios Data Transfer)" tool under "Toolkit" column.


