How to Backup Your iPhone Photos to iCloud and Restore
It is really important to backup your photos in case your device gets damaged, missing, or lost or gets stolen. You don’t want to lose your captured memories from your iOS device. Data is spread everywhere in your iOS device. This has been made easy with the help of iCloud, or you can also easily backup your photos from your iPhone, iPad, or iPod touch to your laptop or computer with the help of iTunes. However with iCloud you have your limits, the free storage is about 5 GB which is granted t every iOS user free of cost who has an Apple ID. This storage comes in handy when you have many iOS devices and you use iCloud frequently to back up your documents and emails.
Part 1: Backing up your Photos to iCloud.
By using the iCloud Photo Library, you get the ability to capture and store all of the pictures in to iCloud without having any limits, unlike the Photo Stream which has been adapted since previous years. As long the iCloud storage is available, iCloud Photo Library can save all of your precious and wonderful moments. However, do you ever wondered what the result of enabling the Photo Stream is?
Before moving on let’s see the major differences between Photo Stream and iCloud Photo Library. At the current moment iCloud Photo Library is still being worked upon and is in beta form; however when using this service it is a recommendation to backup your pictures, which you have plan to store.
Below is a comparison among Photo Stream and iCloud Photo Library:
Photo Stream:
- It has the capability to save your most 1000 recent pictures or images of last thirty days
- It does not utilize the iCloud space
- It is compatible with all of the iOS devices which include iPod, iPhone, PC and Mac.
- It saves web version of pictures, which can lessen the quality
- It cannot sync and upload videos
- It can sync albums and pictures from your PC or Mac through iTunes whenever the Photo Stream is enabled
iCloud Photo Library:
- Saves your personal video and pictures, which don’t have any limits as long the iCloud space is available to store.
- Makes use of iCloud Storage
- Easy to access on iPad, iPhone, and also through iCloud.com
- It can save picture in High Definition (HD) quality on your devices and server also. Moreover it has many formats such as TIFF, GIF, RAW, JPG and others
- It can sync videos and upload the pictures
- However you do not have the ability to sync albums and pictures from PC or Mac with iTunes whenever you use iCloud Photo Library, and also any albums which exist will also get removed when the service gets enabled.
How to enable iCloud photo stream on your iPhone
In Photos app of iPad and iPhone, Photo Stream is available. This is considered as a part of iCloud which syncs pictures anytime whenever it gets connected to the Internet via Wi-Fi. To enable Photo Stream follow the steps mentioned below:
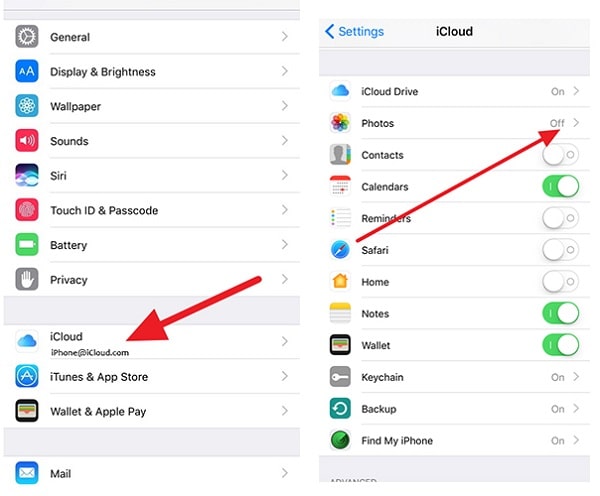
1. On your iPad or iPhone tap Settings
2. Launch iCloud from there
3. Now, tap the Photos

4. Below the section of Photos, keep a check that My Photo Stream is enabled.
5. Photo sharing can also be enabled from the screen below from where you can make a photo stream to share with other people.
How to enable iCloud Photo Library on iPhone
To use iCloud Photo Library on your iPod or iPhone, follow the steps below:
1.Tap Settings on iPhone
2.Scroll and launch iCloud
3.Move down and look for “Photos” and tap it
4.Now enable the iCloud Photo Library from there

Part 2: Other simple ways to backup Photos on iPhone.
Besides iCloud, there are other ways also to back up your photos, among them include Dropbox and Flickr.
Dropbox
Drop box gives 2GB of storage space which is free to its users. However, the space can increase depending on the size you need. Total it offers 500 GB of space at premium rates.
How to backup photos via Dropbox follow the steps below:
1.Install and Download the Dropbox Application which is available free of cost at App Store
2.Create your account, which is free
3.From your home screen launch the Dropbox App
4.At the screen where it says “Camera Upload”, pick “Only Wi-Fi” and enable that option. To give Dropbox the access of your camera allow, tap “Allow”
Now you are all ready to back up your photos.
Flickr
This is also a cloud service which is offered by Flickr where photos are instantly backed up via iPhone. It offers 1TB of space which is absolutely free. To backup Photos follow the steps below:
1.Open App Store and Download the Flickr App
2.Now create your account, or if you are an existing user simply login
3.At the bottom of screen tap the camera shaped icon
4.Select the pictures that you want to backup
Now you are all ready to upload and backup
Part 3: Selectively restore photos from iCloud.
In addition, I will show you a simple we to restore your photos from iCloud. This is where Syncios Data Recovery for iOS comes in. You can choose to selectively recover your photos from iCloud by one-click.
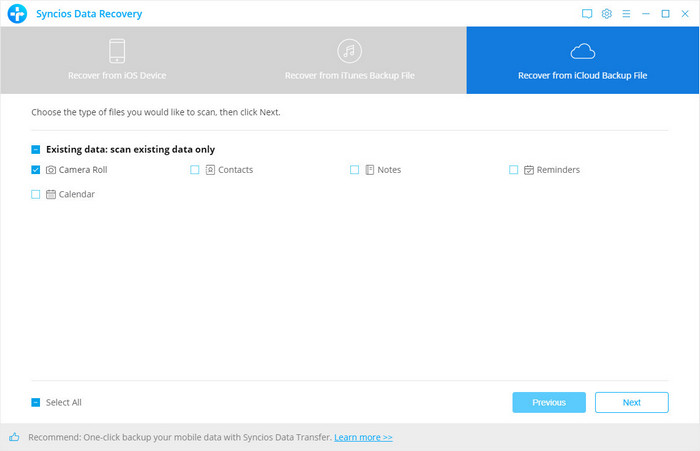
1. After start Syncios Data Recovery on your computer, select "Recover from iCloud Backup File" mode. Enter your iCloud account and password to login.
2. After you log in your iCloud, the program will the types of data you're allowed to restore. To selectively restore photos from iCloud, choose "Camera Roll" here and click on "Next" option to continue.

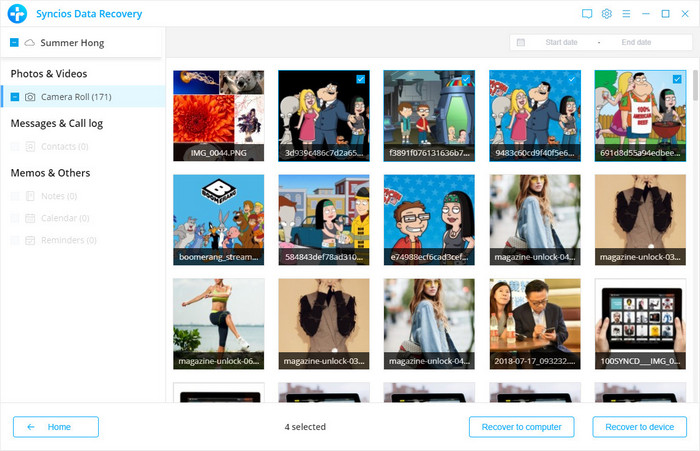
3. Once the scan is completed, you can preview the files you would like to recover. Tick the items you want to recover and click on "Recover to computer" or "Recover to device" button. Then select Recover option on the pop-up to confirm and begin.

Now your photos (or other files) you want to restore can be directly recovered to your iOS device if your iPhone, iPad or iPod touch is connected with your computer with a USB cable during the recovery process.
Conclusion
Here provides you three options to backup and restore iCloud backup. Choose one you prefer and make a complete backup of your iOS device. You won't be afraid of losing important files anymore. If this article helps, you can share it with your friends.


